Three years ago I was spending $180 a week on food — groceries plus restaurant meals — and still opening the refrigerator every night at 6 PM with no idea what to make for dinner. I’d buy ingredients with good intentions, use them halfway, and throw out the rest. My grocery spending was high and my actual eating was inconsistent.
I started meal prepping on a Sunday afternoon as an experiment. I spent about two hours cooking: a batch of rice, roasted vegetables, grilled chicken breasts, hard-boiled eggs, and cut fruit. I put everything in containers and put it in the refrigerator. The following week, every meal took me about ten minutes to assemble.
That was the thing that converted me. Not the money savings (though those were real — my grocery bill dropped to about $110 that week). Not the healthier eating (also real). It was the elimination of the 6 PM decision. Every night that week, I opened the refrigerator and could see my options. I assembled something in minutes, ate well, and didn’t spend $15 on delivery because I was too tired to cook.
This guide is the complete beginner meal prep system — built around the two hours I actually spend every week, not the aspirational six-hour Sunday prep sessions that look beautiful on Instagram and get abandoned after three weeks. It covers how to choose a prep day, which foods batch-cook well and which don’t, how long everything actually keeps, the storage system that prevents waste, and a week-by-week progression that builds the habit gradually.
Affiliate note: This guide contains Amazon affiliate links. If you purchase through them, KitchenStarterGuide.com earns a small commission at no cost to you. Every product I recommend I use in my own kitchen.
What Meal Prep Actually Is (And What It Isn’t)
The most common beginner mistake with meal prep is misunderstanding what the goal is. Meal prep is not about cooking every meal in advance and portioning them into identical containers. That’s a very specific style — and for most people with normal variety preferences, it’s the style that gets abandoned after two weeks.
Meal prep, done sustainably, is about reducing decision friction and active cooking time on busy weekdays. The goal is to walk into a kitchen on a Tuesday night and have 80% of the work already done. That might mean:
- Proteins are already cooked — you just need to reheat and season
- Vegetables are already roasted — you add them to whatever you’re making
- Grains are already cooked — they become the base for bowls, sides, or stir-fries
- Ingredients are washed and cut — you skip the 20-minute prep that feels like the worst part of cooking
This approach — sometimes called ‘component prep’ rather than full meal prep — is more flexible, wastes less food, and is sustainable because you’re not eating the same container five days in a row. You’re cooking creatively on weeknight with an unfair head start.
The other version — full meal prep where you make six identical lunches on Sunday — works well for people with consistent schedules who are optimizing for specific calorie/macro targets. I’ll cover both approaches. But the component method is where I’d recommend starting.
The Prep Day Decision: When and How Long
Choosing Your Prep Day
Sunday is the classic prep day for one reason: most people have grocery stores near them, time in the afternoon, and a week ahead that benefits from the preparation. But Sunday doesn’t work for everyone, and the best prep day is the one you’ll actually do consistently.
Ask yourself: which day of your week is the most consistently unstructured afternoon? That’s your prep day. If you work weekends, Thursday evening before your work week starts is equally valid. The system works on any day — what matters is consistency.
If you genuinely can’t find two contiguous hours on one day, split the prep across two shorter sessions: a 45-minute session to cook proteins and grains, and another 45-minute session the next day to roast vegetables and prep snacks. The total time is the same; it’s just distributed differently.
How Much Time Does It Actually Take?
Here’s an honest time breakdown for a standard beginner prep session:
- Grocery shopping (if not done separately): 30–45 minutes
- Washing and cutting vegetables: 20–30 minutes
- Cooking proteins (sheet pan or skillet): 25–35 minutes active, 20–30 minutes hands-off oven time
- Cooking grains (rice, quinoa, or farro): 5 minutes active, 15–20 minutes hands-off
- Portioning and storing: 10–15 minutes
Total hands-on time: 60–75 minutes. Total elapsed time including hands-off cooking: 90–120 minutes. This is realistic for someone who isn’t experienced in the kitchen. Experienced home cooks with a system can do the same prep in 60 minutes.
The two-hour mark shrinks as you develop the habit. After four or five prep sessions, you’ll have a rhythm — you’ll know which vegetables roast at the same temperature (most of them), you’ll have your knife work speeds up, and you’ll stop consulting recipes for things you’ve made many times.
What to Prep: The Foods That Batch-Cook Well
Not all foods benefit from batch cooking. Some improve with time. Some degrade in ways that ruin the meal. Knowing the difference prevents wasted prep and wasted food.
Proteins — The Highest-Value Prep Item
Pre-cooked protein is what makes the biggest difference in weeknight cooking. Protein takes the longest to cook actively and is the hardest to improvise when you’re tired. Having it ready changes the category of weeknight cooking from ‘cooking a meal’ to ‘assembling a meal.’
Best proteins to batch-cook:
- Chicken breasts or thighs — baked at 400°F, stored in cooking liquid or broth to keep moist. Keeps 4 days refrigerated. Can become salads, bowls, wraps, sandwiches, or stir-fry bases.
- Ground meat (beef, turkey, chicken) — cooked with minimal seasoning so it’s flexible. Add taco seasoning, pasta sauce, or curry paste at the reheating stage. Keeps 4 days.
- Hard-boiled eggs — 6–12 at once, keeps 7 days unpeeled in the shell or 5 days peeled. Breakfast, snack, or salad protein.
- Salmon or other fish — cook fresh, batch-prep same day. Does not reheat well after refrigeration — use within 2 days and reheat gently.
- Legumes (lentils, chickpeas from dry) — 30 minutes to cook, keeps 5 days, freezes perfectly. Far cheaper than canned and useful across many cuisines.
Proteins that don’t batch-cook well:
- Steaks and pork chops — texture degrades significantly on reheating. Cook fresh.
- Shrimp — overcooked when reheated, rubbery texture. Cook fresh or use in cold applications only.
- Breaded proteins — lose crispness entirely. Cook fresh.
Grains and Starches — The Foundation Layer
A batch of cooked grains in the refrigerator is one of the highest-utility prep items available. They’re the base that makes bowls, stir-fries, fried rice, and grain salads possible in five minutes rather than thirty.
- White or brown rice — 4 cups dry makes enough for the week. Keeps 5–6 days refrigerated, freezes in individual portions for months.
- Quinoa — cooks in 15 minutes, keeps 5 days. Higher protein than rice, neutral flavor.
- Farro or barley — nutty flavor, substantial texture. Excellent for grain bowls and salads.
- Roasted sweet potatoes — cube and roast at 400°F for 25 minutes. Keeps 4–5 days, reheats well.
- Pasta — cook slightly underdone, toss with a little olive oil to prevent sticking. Keeps 5 days, finishes cooking in sauce or pan.
Best rice cooker for batch cooking: Zojirushi NS-ZCC10 5.5-Cup Rice Cooker— Perfect rice every time, keeps warm for hours without drying out, 5-cup capacity is ideal for weekly batches.

Budget alternative: the best $55 rice cooker for perfect fluffy rice.
Vegetables — Roasted and Raw
Vegetables are the category with the most variety in how they batch-cook. Some roast beautifully and keep well. Others are best prepped but not cooked. Understanding this prevents the soggy-container problem that makes meal prep feel unrewarding.
Best vegetables to roast in batches:
- Broccoli and cauliflower — 400°F, 20–25 minutes, keeps 4 days
- Brussels sprouts — 400°F, 25–30 minutes, keeps 4 days
- Bell peppers and zucchini — 400°F, 20–25 minutes, keeps 3–4 days (slightly softer after storage)
- Beets — 400°F wrapped in foil, 45–60 minutes, keeps 5 days
- Root vegetables (carrots, parsnips, turnips) — 400°F, 30–35 minutes, keeps 5 days
Best vegetables to prep raw (wash, cut, store uncooked):
- Leafy greens — washed and spun dry, stays crisp 5–6 days in a container with a paper towel
- Cucumbers, celery, carrots — cut into sticks, keeps 5–7 days in water in a sealed container
- Cherry tomatoes — wash and dry, keeps 5–6 days
- Bell peppers — sliced, keeps 4–5 days
Vegetables that don’t prep well in advance:
- Avocado — prep day-of only
- Dressed salads — the greens wilt. Dress immediately before eating.
- Cut apples and pears — oxidize quickly (toss with lemon juice if prepping in advance)
Sauces and Dressings — The Flavor Layer
A batch of sauce transforms the same proteins and grains into completely different meals. This is the component that prevents meal prep from feeling monotonous.
- Tahini lemon dressing — tahini, lemon juice, garlic, water, salt. Keeps 7–10 days, goes on grain bowls, salads, and roasted vegetables.
- Simple vinaigrette — olive oil, vinegar, Dijon, honey, garlic. Keeps 2 weeks refrigerated.
- Teriyaki sauce — soy sauce, honey, garlic, ginger, cornstarch. Keeps 10 days, works on chicken, salmon, tofu, and stir-fries.
- Tomato sauce — canned crushed tomatoes, garlic, olive oil, basil. Keeps 5–7 days, freezes well.
- Chimichurri — fresh parsley, garlic, olive oil, red wine vinegar, chili. Keeps 2 weeks. Transforms grilled or roasted protein.
The Storage System: Containers, Labels, and Shelf Life
Bad storage is where meal prep fails most often. Good intentions and good cooking undone by wrong containers, no labeling, and no sense of what needs to be eaten first.
Container Selection
The container matters more than most people think. The wrong containers lead to leaking in bags, uneven reheating, and food that spoils faster than it should.
- Glass containers — the best all-around choice. Microwave-safe, oven-safe, don’t absorb odors or stains, last indefinitely. Heavier than plastic and more expensive upfront.
- BPA-free plastic containers — lighter, more affordable, good for transport. Not oven-safe, can absorb odors over time. Replace when scratched or stained.
- Mason jars — ideal for salads (greens at top, dressing at bottom, eaten upside-down), overnight oats, soups, and grains. Inexpensive and stackable.
- Silicone bags — reusable alternative to zip-lock bags. Good for snacks, pre-portioned nuts, and cut vegetables.
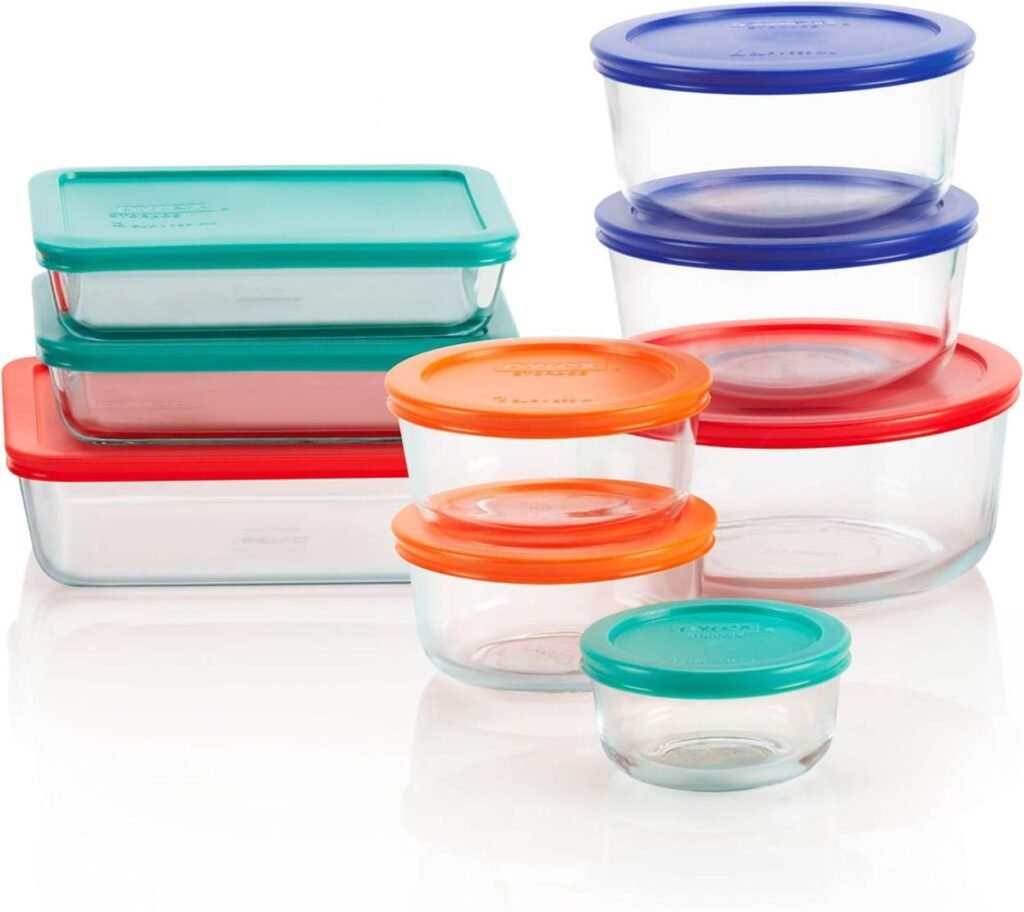
Best glass container set: Pyrex Simply Store 9-Piece Glass Container Set— Multiple sizes with locking lids, microwave and oven safe, stackable. The container set I’ve used for three years.
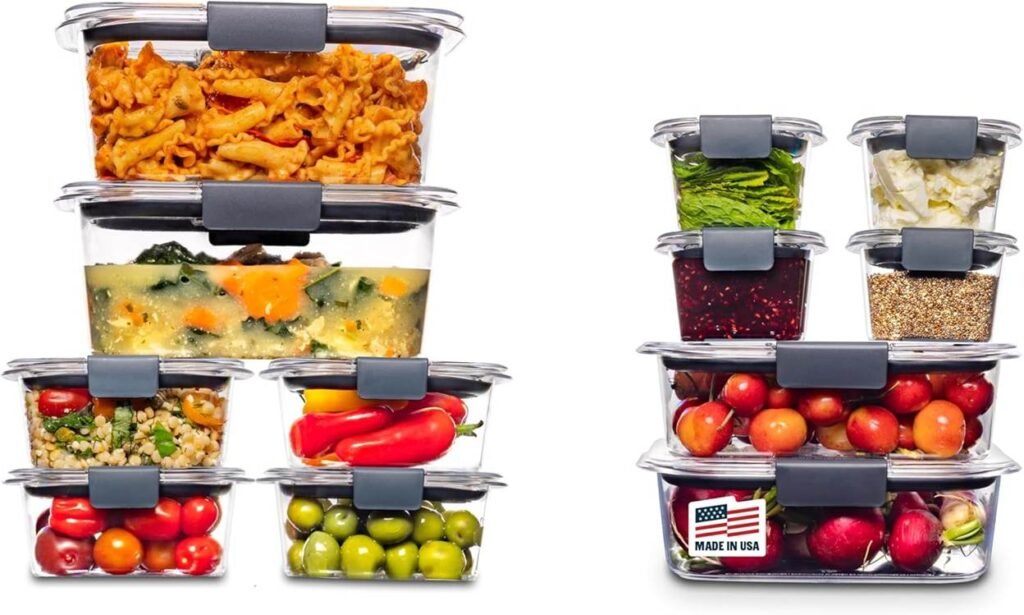
Best budget plastic containers: Rubbermaid Brilliance Food Storage Set— Leak-proof lids, crystal-clear design so you can see contents, stackable, microwave safe.
The Labeling System
Labeling your containers prevents the mystery fridge problem — the one where you’re staring at four containers trying to figure out which one is three days old and which one is fresh. Masking tape and a marker is all you need. Write the item name and the date it was made.
The rule I use: if it’s not labeled, I assume it’s old and needs to be used today. This creates an incentive to label everything.
Actual Shelf Life for Batch-Cooked Foods
These are the real numbers — not the overly conservative ones on packaging, and not the overly optimistic ones from food influencers:
- Cooked chicken: 4 days refrigerated, 3 months frozen
- Cooked ground meat: 4 days refrigerated, 3 months frozen
- Cooked eggs (hard-boiled, unpeeled): 7 days refrigerated
- Cooked rice or grains: 5–6 days refrigerated, 2 months frozen
- Roasted vegetables: 4–5 days refrigerated (most vegetables)
- Raw cut vegetables (not leafy): 5–7 days refrigerated
- Washed leafy greens: 5–6 days with paper towel moisture management
- Homemade sauces: 5–14 days depending on ingredients (anything with fresh herbs 5–7 days; vinaigrettes up to 2 weeks)
- Cooked pasta: 5 days refrigerated
The practical takeaway: most batch-cooked foods are fine through the work week if prepped on Sunday. By Friday you’re eating the last of it, and the timeline works.
The Beginner Meal Prep Workflow: Step by Step
This is the exact sequence I follow on prep day. The order is designed to minimize active cooking time by using oven time for hands-off tasks.
Before You Start: The Prep Session Setup
- Review the week ahead: what days will you actually cook? How many lunches do you need? Dinners? Adjust batch sizes accordingly. Prepping for 5 days when you have dinner plans two of those nights wastes food.
- Check what’s already in the refrigerator: use up older ingredients first. Prep sessions should include a ‘use first’ layer of older produce and proteins.
- Make a simple shopping list from what you plan to prep. One protein, one or two grains, three or four vegetables, one or two sauces. That’s a week’s worth of components.
- Set out all containers before you start. Having them ready prevents the ‘where do I put this’ delay at the end when everything’s cooked and cooling.
The Session Sequence
Step 1 (minutes 0–10): Start the oven, set up the slow cooker or Instant Pot if using
Preheat oven to 400°F. If you’re batch-cooking a protein in the slow cooker (chicken thighs in broth is ideal), get it started now — it runs hands-off while you do everything else.
For large batch slow cooker proteins: best slow cooker for family meals 2026.
Step 2 (minutes 5–25): Prep and roast vegetables
Cut all vegetables that will be roasted. Season simply with olive oil, salt, and pepper. Dense vegetables (beets, sweet potatoes, root vegetables) go in first on one sheet pan. Faster vegetables (broccoli, Brussels sprouts, bell peppers) go on a second sheet pan 10–15 minutes later.
Use two sheet pans simultaneously — this is the single biggest time-saver in meal prep. Roasting one pan at a time doubles your roasting time unnecessarily.
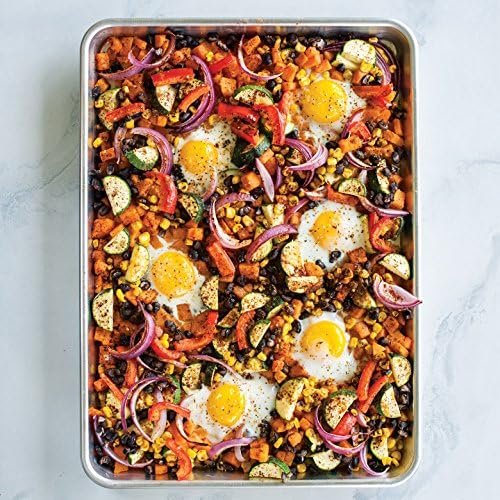
Best sheet pans for batch roasting: Nordic Ware Natural Aluminum Half Sheet Pan (2-pack)— Heavy-gauge aluminum that won’t warp. Roast two full batches simultaneously.
Step 3 (minutes 20–30): Cook grains
Get rice, quinoa, or farro started on the stovetop or in a rice cooker. This runs hands-off. Rice cookers handle this perfectly if you have one — no monitoring required.
Step 4 (minutes 25–45): Cook a second protein on the stovetop if needed
If the slow cooker protein isn’t running, cook a sheet pan protein alongside the vegetables, or do a stovetop batch of ground meat in a large skillet. Ground meat takes 10 minutes on medium-high.
Step 5 (minutes 40–55): Prep raw vegetables and make sauces
While the oven is finishing and grains are cooking, wash and cut vegetables that will be stored raw. Make one or two sauces — both come together in 5 minutes with a jar and a whisk or an immersion blender.
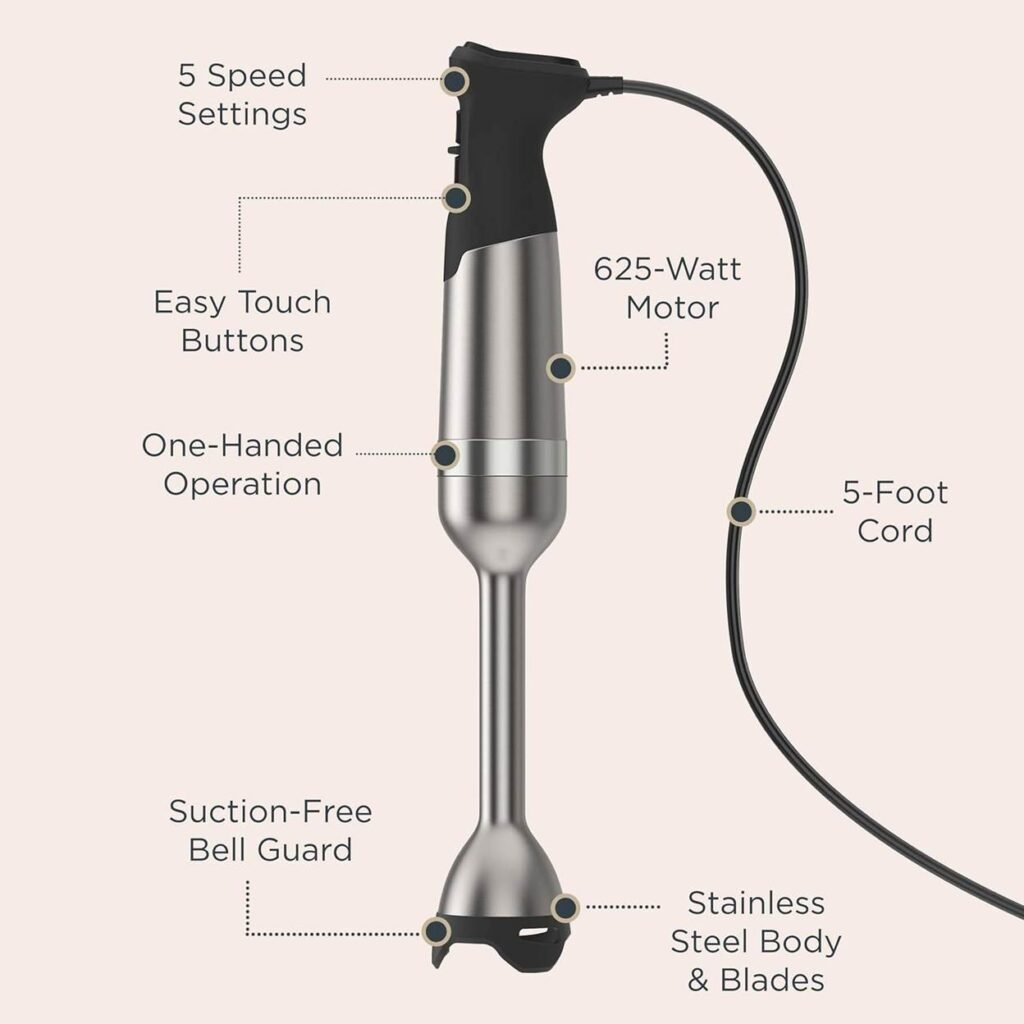
Best immersion blender for quick sauces: Vitamix Immersion Blender— The most durable immersion blender available. Sauces, soups, and dressings in 60 seconds.
Budget option: the $22 immersion blender that replaced my giant countertop blender.
Step 6 (minutes 55–75): Cool, portion, label, store
Let everything cool for 10–15 minutes before storing — putting hot food directly into containers creates condensation that accelerates spoilage. While things are cooling, label your containers. Portion proteins and grains into individual servings if you prefer grab-and-go, or store in bulk and portion at mealtime.
Total elapsed time: about 90 minutes. Most of that is hands-off.
How to Build Meals From Your Prepped Components
Component prep only works if you know how to combine the components into actual meals. Here’s a simple formula for any time-of-day:
The Bowl Formula
Base (grain or leafy greens) + protein + roasted or raw vegetable + sauce. This formula covers lunch and dinner in infinite variations:
- Brown rice + chicken + roasted broccoli + tahini dressing
- Quinoa + hard-boiled egg + raw cucumbers and tomatoes + vinaigrette
- Farro + ground beef + roasted bell peppers + chimichurri
- Leafy greens + salmon + roasted sweet potato + lemon vinaigrette
The same components produce four completely different meals depending on how they’re combined. That’s the power of component prep — variety without repeated cooking.
The 15-Minute Weeknight Dinner
With prepped components in the refrigerator, most weeknight dinners follow this pattern:
- Reheat protein in a skillet with a small amount of oil over medium heat, 3–4 minutes. Or microwave in a covered container with a splash of water, 90 seconds.
- Reheat or use room-temperature grain as a base in a bowl.
- Add roasted vegetables from the refrigerator — they’re fine at room temperature or quickly reheated in the microwave.
- Apply sauce or seasoning. Serve.
Elapsed time: 10–15 minutes. Compare this to starting from raw ingredients on a Tuesday night: 45–60 minutes.
Breakfast Prep
Breakfast is often ignored in meal prep guides but benefits significantly from it. Three minutes in the morning instead of fifteen:
- Overnight oats: 1/2 cup oats + 1/2 cup milk + 1 tbsp chia seeds in a mason jar. Refrigerate overnight. Top with prepped fruit in the morning. 2 minutes of prep the night before.
- Egg muffins: whisk eggs with vegetables and cheese, pour into a muffin tin, bake at 350°F for 18–20 minutes. Makes 12. Keeps 5 days. Microwave 45 seconds per muffin.
- Grain bowls: prepped farro or quinoa + prepped fruit + honey and yogurt. Assembles in 2 minutes.
Best for egg muffins: Wilton Non-Stick 12-Cup Regular Muffin Pan— Heavy-gauge steel, non-stick coating, dishwasher safe.
The Equipment That Makes Meal Prep Faster
You don’t need special equipment to meal prep. But specific tools remove the friction that makes prep sessions feel longer than they need to be.
The Non-Negotiables
These are the items that make a real difference in prep session efficiency:
- A sharp chef’s knife — half your prep time is cutting. A sharp knife cuts prep time by a third. A dull knife makes every cut harder and slower.
- Two large sheet pans — roast two batches simultaneously. One sheet pan means sequential roasting that doubles your time.
- A large Dutch oven or stockpot — batch-cooking soups, stews, and braises
- A rice cooker or Instant Pot — hands-off grain cooking while you do other tasks
- A set of glass storage containers in multiple sizes
Knife sharpening guide: the $35 knife sharpener that turned my dull knives back into razor blades.
Best Dutch oven: the $99 Dutch oven that makes fall-off-the-bone ribs for under $3 a serving.
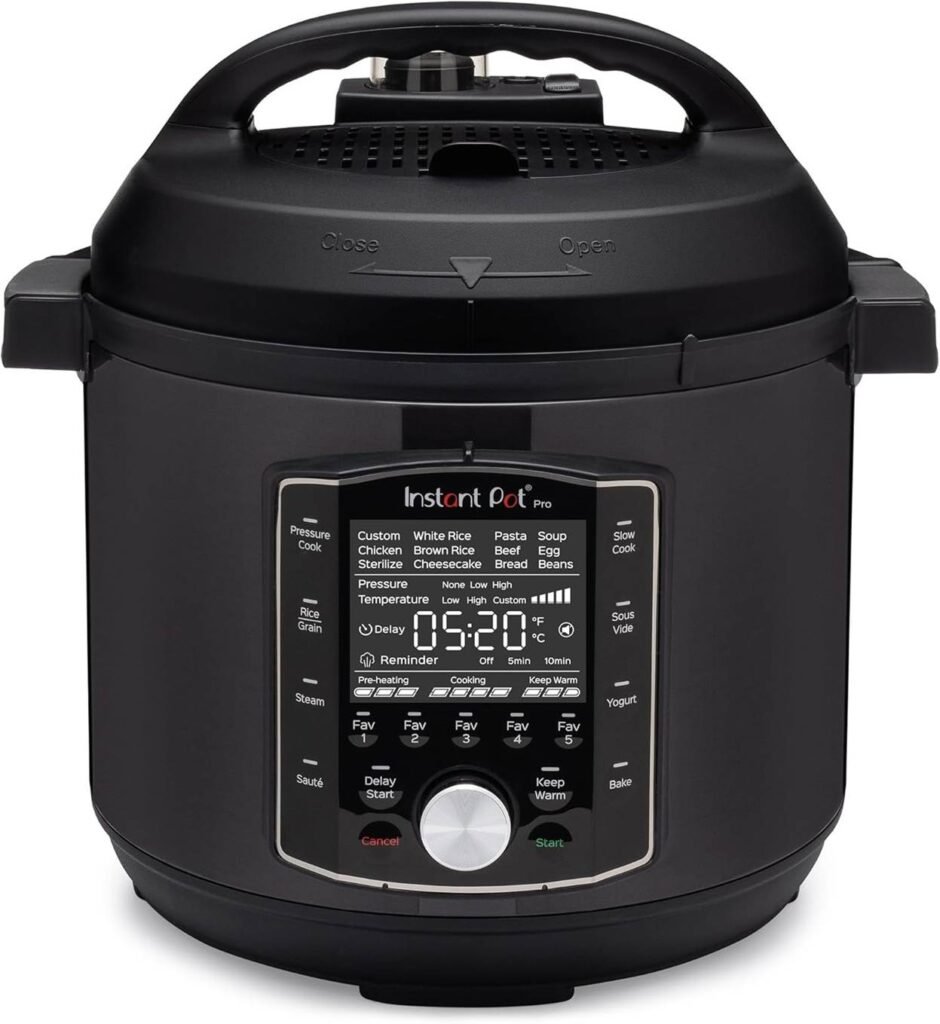
Best Instant Pot for batch cooking: Instant Pot Pro 10-in-1 Electric Pressure Cooker (6 Qt)— Pressure cooking, slow cooking, rice, steam, sauté — the one appliance that replaces four. Dried beans in 30 minutes, chicken thighs in 15.
The Nice-to-Haves
- Kitchen scale — measuring by weight is faster and more accurate than measuring by volume for grains, proteins, and sauces
- Salad spinner — washing and drying greens takes 3 minutes with one, 10 minutes without
- Mandoline slicer — uniform vegetable slices that cook evenly and look better. Use the cut-resistant glove.
- Vacuum sealer — extends refrigerator shelf life by 50–75% and eliminates freezer burn
Kitchen scale guide: the $12 digital kitchen scale that stopped me ruining every baking recipe.
Mandoline guide (with safety notes): the $38 mandoline that ends onion tears forever.
Vacuum sealer review: the vacuum sealer that kept leftovers fresh for weeks in the freezer.
Building the Habit: The Four-Week Progression
Most people who try meal prep and quit do it because they started too ambitiously. A four-hour Sunday session with twelve dishes produces burnout, not a habit. Here’s a gradual build that produces sustainable results.
Week 1: Single Component — Pick One Thing
Cook only one batch item: a pot of rice, a sheet pan of roasted vegetables, or six hard-boiled eggs. Use it in at least two meals during the week. That’s it. The goal is confirming the habit works for you, not optimizing the system.
Week 2: Add a Protein
Add one batch protein to Week 1’s component. If you prepped rice last week, now add baked chicken breasts. Two components combine into at least four different meals during the week.
Week 3: The Full Component Set
One protein, one grain, two vegetables, one sauce. This is the complete beginner prep. Your prep session will take 90 minutes. You’ll have building blocks for every lunch and dinner during the week.
Week 4: Add Breakfast Prep
Add overnight oats or egg muffins to Week 3’s system. Total prep time increases by 15–20 minutes. Breakfast is now also handled.
By week four you have a complete weekly food system running in about two hours on one day. That’s the goal, and it’s achievable through this gradual progression more reliably than attempting it on day one.
Food Safety: The Short Version
Meal prep has a small food safety learning curve. Here’s what matters:
- Cool food before storing: hot food in a sealed container creates steam condensation that accelerates bacterial growth. Let things cool to room temperature before lidding and refrigerating. Large batches of soup or stew should be divided into smaller containers to cool faster.
- The 2-hour rule: cooked food shouldn’t sit at room temperature for more than 2 hours total. If prep is taking longer, refrigerate partially finished items while others cook.
- Reheat to 165°F: use a food thermometer for proteins you’re reheating. Visual checks are unreliable.
- When in doubt, throw it out: off smell, slimy texture, or visible mold means discard. The cost of throwing something out is less than the cost of food poisoning.
Best instant-read thermometer for reheating: ThermoPro TP19H Waterproof Meat Thermometer— 3–4 second read, accurate to ±1°F, waterproof, under $25. The thermometer I use for both cooking and reheating.

Full thermometer guide: the $16 meat thermometer that gave me steakhouse-perfect steaks.
Final Thoughts from Meg
The meal prep system I run today is essentially the same one I built in that first Sunday afternoon three years ago, just more efficient. The components change week to week based on what’s at the store and what I’m in the mood for, but the framework — one protein, one grain, vegetables, one sauce — has been stable since week three.
What I want you to take away from this guide is that meal prep doesn’t require a dramatic lifestyle overhaul. It requires about two hours, a grocery list, the right containers, and a willingness to repeat the same framework until it becomes routine. The first session is the slowest. The tenth session is genuinely fast.
The refrigerator you open on Tuesday night after a long day should not feel like a problem to solve. It should feel like an opportunity. That’s what a well-prepped fridge is: your own personal fast-casual restaurant, with exactly the ingredients you like, ready to assemble in ten minutes.
Prep once. Eat all week. Open the fridge with confidence.
This guide contains Amazon affiliate links. If you purchase through them, KitchenStarterGuide.com earns a small commission at no extra cost to you.